Zombies in Call of Duty: Vanguard brings a few new mechanics to the game that impact the gameplay quite a bit. While you might be familiar with the gameplay of Zombies and classic upgrades like Pack-a-Punch there are new ways to make yourself stronger. Those are artifacts and covenants and here are the best of them in Call of Duty: Vanguard Zombies.
Artifacts
In Der Anfeng you team up with one of the four Dark Aether entities. They will serve as your guides and companions throughout completing the objectives. Even though listening to their comments is quite entertaining the core goal of this merge is their power. When choosing an entity you get to use their power to help fight the undead.
As soon as you load up to the game you will be presented with a variety of loadouts to choose from. You can customize those loadouts however you want. Any weapon and any artifact. Unlike weapons that are stuck with you, artifacts can be changed mid-game. To change them just equip the loadout with the artifact you want. The artifact will change, but the weapon won’t.
Thanks to that amazing feature you have the option of experimenting with your playstyle on the go or just focusing on a single build. We will discuss every artifact, its pros, cons, and the best environments to use.
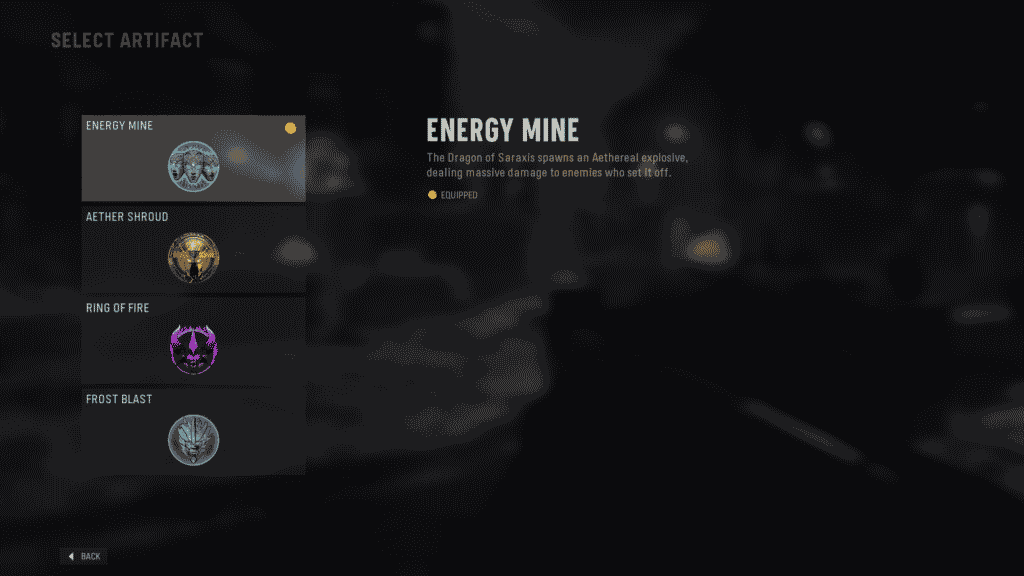
Energy Mine
This ability plants an energy mine as soon as you use it. It triggers as soon as the zombie gets close enough and explodes dealing massive amounts of damage. Good for crowded situations as it will deal with almost anyone who is within its range. Pairing it up with good Covenants makes it a universal artifact to use. The only downside is that it doesn’t do much in terms of benefiting the team except for just killing a bunch of enemies.
Aether Shroud
Using this ability makes you invisible for 5 seconds. The viability of this one depends very much on whether you playing solo or in a party. If you are playing solo this artifact will not give you enough power to fight zombies compared to others. On the other hand, in a team, it can be a great opportunity to crossfire the enemy or get some loot to go forward.
Even if you are playing solo there is one exception to use it: Harvest objective. In Harvest, you have to deposit runes to the totem and if it is a late-game objective zombies will be all over the place making the process a bit difficult. Going invisible and safely depositing runes can save your life as opposed to getting surrounded while standing at the totem trying to shoot the bad guys at the same time.
Ring of Fire
Ring of fire creates a, well, ring, that boosts your damage while you are inside it. This is a decent artifact to use in Blitz. Blitz always has the smallest and tightest maps, which means you won’t be forced to leave the ring very often. In other game modes, it’s not useful that much as you will have to run from place to place almost all the time.
Frost Blast
This ability deals AoE damage on use and then leaves a field that slows the enemies who enter. There are a few issues with this artifact. First, the duration of the slowing area is incredibly short. It disappears a few seconds after the AoE blast so it might not slow enough enemies. At this point, Frost Blast is the same as the Energy Mine just deals less damage. You can pair the Energy Mine with the Cryofreeze Covenant and voila.
This artifact is definitely viable, it only depends on the type of build you are going for. If you don’t have the Cryofreeze, take the Frost Blast and pair it up with something else.
Covenants

Covenants are perks that you can but at the Altar of the Covenants for a Sacrificial Heart. Sacrificial Heart is given out after successfully completing an objective. Every Covenant has a rare, epic, and legendary version that empowers its buff/effect. Since you can hold up to three Covenants at the same time there is a big variety of builds to play with.
Here are all the Covenants in the game and what they do:
- Ammo Gremlin. Stowed weapon refill ammo
- Bloodlust. Melee attacks do more damage and heal you
- Brain Rot. Chance to turn an enemy while shooting it
- Cull the Weak. Deal more damage to stowed or stunned enemies
- Cryofreeze. Chance to slow an enemy when shooting it
- Dead Accurate. Successive shots on the same enemy deal more damage
- Death Blow. Critikall kills return a bullet to the clip
- Mother Lode. Small chance to keep equipment after using it
- Ressurectionist. Revive allies faster
- Splatterfest. Enemies killed by explosions have a chance to explode
- Unholy Ground. Deal more damage while stationaty
Any covenant can be useful when is put in a build with a purpose. But if you are not really into creating builds and just want the best ones for shooting and completing objectives there are a few universal ones. Bloodlust, Cryofreeze, and Dead Accurate are all great options for a no-build solo character. If you are playing in a team though I suggest trying and creating dedicated builds with your friends. It’s way more fun than using the same three Covenants every time you play.