If you’re looking to optimise your Deep Rock Galactic Gear setup, you’ve come to the right place! This short Deepcore mods guide will discuss the options for the five tiers of Deepcore mods and whether or not they’re worth considering in your own mod build or outright skippable.
Tier 1
- Gyro Stabilisation – First shot has pin-point accuracy
- Supercharged Feed Mechanism – Rate of fire increased by 2
Gyro Stabilisation always felt like a bit of a trap option to me. The first-shot of a clip will absolutely hit the target, but that’s all you’re getting from that slot. Not particularly great in my opinion.
Meanwhile, Supercharged Feed Mechanism offers you a rate of fire boost that you can make use of consistently, and when combined with Floating Barrel later in your build, will still have great accuracy. By all means, try both, but don’t expect too much from Gyro Stabilisation.
RELATED: Deep Rock Galactic: Flare Gun Mods Guide
Tier 2
- Increased Caliber Rounds – Individual shot damage increased by 2
- Expanded Ammo Bags – An additional 100 maximum ammo
The classic upgrades return to fight over another early tier choice. In this case, its Increased Caliber Rounds with a +2 damage upgrade (15 to 17) versus Expanded Ammo Bags, increasing your maximum ammo from 350 to 450 – with the notable advantage of an extra 50 bullets per resupply thrown in.
Personally, I find Scout doesn’t have many ammo issues, so Increased Caliber Rounds feels like the winner here, but again both are perfectly viable – you have plenty of base max ammo and base damage.
Tier 3
- Floating Barrel – Weapon recoil halved, for a significant stability improvement
- Improved Propellant – Individual shot damage increased by 1
- High Capacity Magazine – Magazine size expanded by 10 additional rounds
Floating Barrel. Oh my. I usually advocate against recoil control measures as it comes at the cost of other potentially considerable upgrades. In this case, Floating Barrel is such a significant reliability upgrade that you should absolutely try it first.
Improved Propellant offers a comparatively small damage boost, and while it would be nice to have the benefits of High Capacity Magazine to avoid reloading as much, Floating Barrel is such a significant upgrade its simply difficult to justify taking anything else in tier 3.
RELATED: Deep Rock Galactic: Jury-Rigged Boomstick Mods Guide
Tier 4
- Hollow-Point Bullets – Weakspot damage bonus increased by a further 20%
- Hardened Rounds – 600% additional damage dealt to armour
- Improved Gas System – Rate of fire increased by 2
This tier looks a bit more complex than it actually is. While Improved Gas Systems level of enhanced fire rate was useful before, and while Hardened Rounds offers a huge amount of additional armour damage, Hollow-Point Bullets should be ideal choice here in almost every mission.
This is due to the fact that the scout is typically tasked with focusing on the larger enemies and rushing them down before they become a problem for the scout or their team. This doesn’t rule out either other option, but the following will – The scout also has the best personal-mobility tool in the entire game, the Grappling Hook. The Grappling hook allows you to slingshot behind any priority target and nail their weak spots reliably – and it has a low enough cooldown to be able to do so reliably, making Hollow-Point Bullets an exceptionally strong mod choice.
Tier 5
- Battle Frenzy – Gain a short lived burst of movement speed on kill
- Battle Cool – Gain drastically increased accuracy on kill
- Stun – 30% chance to stun per shot
And its unique perk time. Battle Frenzy will offer you a burst of movement speed whenever you kill anything, while Battle Cool drastically boosts your accuracy on kill. Both of these trigger on the same condition – and it should be noted that even the likes of critters and plants will activate both mod effects.
This tier basically comes down to if you feel like you need more mobility, you take Battle Frenzy. But scout is already quite mobile. If you want to be more reliable at dealing damage, you take Battle Cool, though you may feel like you don’t need it if you took Floating Barrel earlier. If both of these are true, you can always take the ever-reliable Stun option, it doesn’t do much but it could always help you in a bad spot – and it is certainly better than not taking any option.
RELATED: Deep Rock Galactic: Grappling Hook Mods Guide
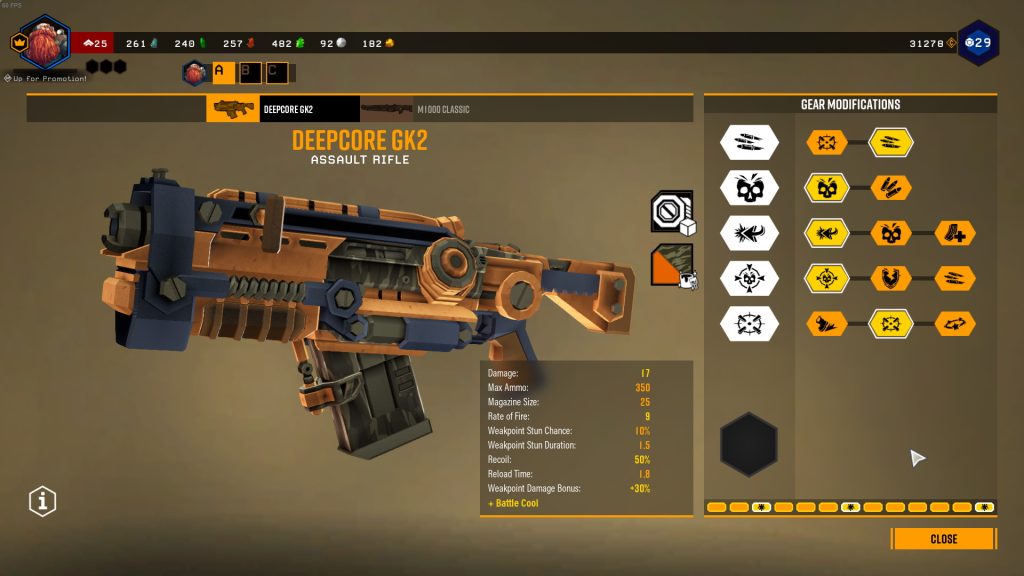
If you’ve been agreeing me for most of this guide, you’ll probably end up with something looking a bit like this image above. That concludes this short Deepcore mods guide – did this help you at all? Do you disagree with my thoughts on the various mods available? Let me know in the comments below.
If you’d be interested in reading more about Deepcore GK2 Mods, the link to the wiki is here.
Found this Deepcore mods guide useful? Don’t forget to share our work with the buttons below! Also, be sure to follow us on Twitter and check out our YouTube Channel for more great content from the Gamezo Team!